 Choosing Your Initial Settings: I hope you now see what physiologies to consider when setting up the ventilator and your goals for each. If your patient doesn’t fit into one of these three categories, then I set up my ventilator as if I was managing a patient who has refractory hypoxemia to maintain a lung protective strategy even if they don’t think they have very significant lung disease. Maintaining a lung protective strategy with low tidal volume ventilation has been shown to decrease ventilator induced lung injury and minimize harm, even in patients without refractory hypoxemia and ARDS (1-2).
Step 1: Choose Your Mode
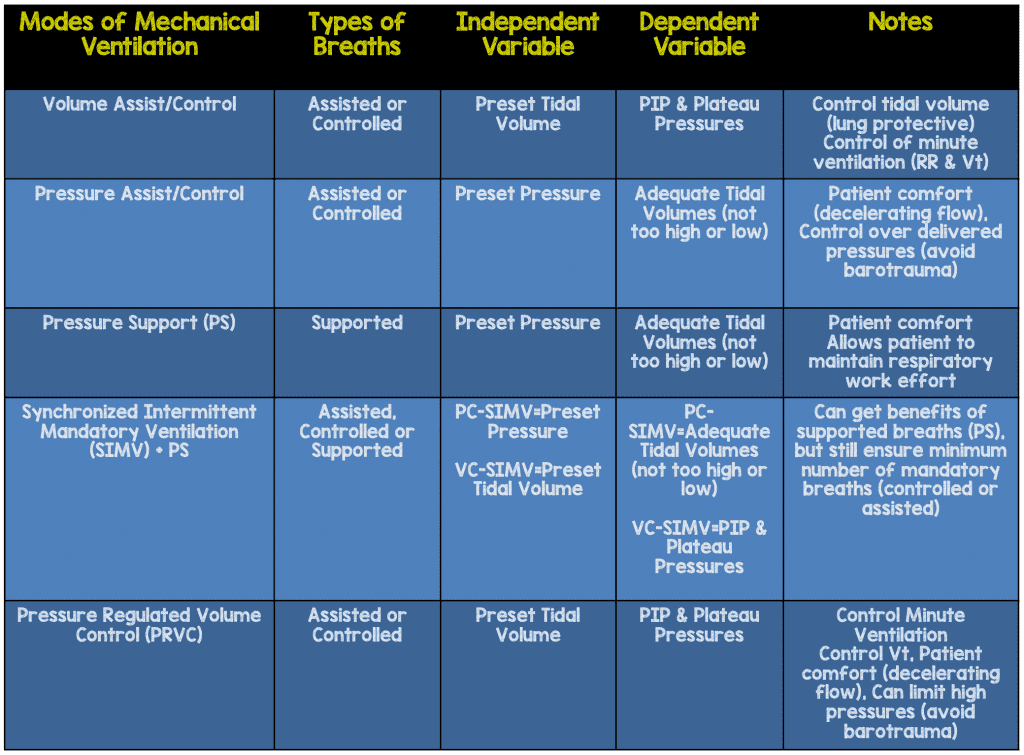
I discussed various modes in detail throughout the previous 5 parts and the graph below gives you an overview explaining the basics of each mode.

Volume Assist/Control:
If you choose a volume mode then the advantage is that you will have more control over your patients minute ventilation, as you will be able to set a target tidal volume and a rate. In Assist Control, the patient can trigger the ventilator (Assist Breath) and determine their own rate, but once they trigger they will receive the tidal volume you set. If the patient becomes apneic or you set the rate much faster than the patient is breathing, then your patient will get all control breaths. I use this mode in my severe obstructive disease patients (Asthma & COPD) as we discussed in Part 4. It also has the advantage to control tidal volume therefore preventing volutrauma and assuring low tidal volume ventilation.
Disadvantages:
The disadvantage of a volume mode is that the inspiratory flow rate is a constant flow and not a variable decelerating inspiratory flow that we see in pressure breaths and our normal physiologic breathing pattern. A variable decelerating flow pattern, allows for a very fast inspiratory flow rate at the start of the breath, then throughout the remainder of inspiration, the flow decelerates. Because of this constant inspiratory flow we use in volume breaths, patients may become uncomfortable.
We cannot exactly match the flow pattern, but a way to improve a patients comfort is to increase their inspiratory flow rate. A normal inspiratory flow rate can range between 60-90 liters/minute, and you can increase the flow rate to give a breath faster thus trying to mimic our decelerating flow pattern. The breath will still be a constant flow and won’t decelerate throughout inspiration like a pressure breath or normal breath would. However, setting an increased flow rate can help with patient comfort.
Another careful consideration in using a volume mode is that you have control over the tidal volume but not the PIP. Your goal is keep the PPlat <30 mm Hg to avoid barotrauma. Just keep in mind that PIP is constantly displayed on the ventilator with each breath, but to obtain a PPlat you have to do an end-inspiratory pause to assure that the PPlat is less than 30 mm Hg.
Pressure Assist/Control:
If you choose a pressure mode, the advantage is possibly patient comfort due to the variable decelerating inspiratory flow that we discussed above and also in Part 5. It also may give you the advantage of improving oxygenation due to the constant pressure waveform also discussed in Part 5. You also can limit your pressure delivery therefore prevent barotrauma.
Disadvantage:
Clearly the disadvantage is that you may loose some control over the minute ventilation. You can set a rate, but if this is an assist control mode the patient can trigger the ventilator, but when they do, they will get a set pressure. If your patient develops apnea or you set a rate higher than the intrinsic rate, then they will get all controlled breaths. You should pay close attention to the tidal volume being delivered to make sure that the volume is not too high or too low, especially in the setting of someone with changing lung compliance or bronchospasm.
Pressure Regulated Volume Control (PRVC)
A mode that is very popular in many medical centers is known as Pressure Regulated Volume Control (PRVC) but known by different names depending on what ventilator brand you are using.

If you want to use a pressure mode of delivery with all it’s theoretical benefits, don’t want to keep adjusting the pressures, and target a tidal volume like a volume mode then PRVC is the mode for you. This is a smart mode of ventilation and I often teach my trainees that with this mode there is an imaginary respiratory therapist that was shrunk down and put in the ventilator. The tiny imaginary therapist’s job is to deliver a set tidal volume with the lowest pressure possible.
The tiny therapist delivers a pressure breath with a decelerating inspiratory flow and constant pressure (just like a normal pressure mode), but now the breath will target a tidal volume and will cycle to expiration once that volume is reached (just like a volume mode). Normally a pressure breath gives a constant pressure for a set time regardless of the volume delivered. This tiny therapist actually calculates the patient’s compliance and will deliver the lowest pressure possible (rather than a constant pressure that needs to be manually adjusted) to deliver the set tidal volume.
Besides calculating the lung compliance and delivering a set tidal volume, the tiny therapist is also given instructions to not exceed a certain pressure (pressure limit) in order to deliver this tidal volume. If the compliance decreases too much (lung gets stiffer) then the therapist will not give any more pressure to deliver the tidal volume once the pressure limit is reached. For example if the pressure limit is set at 30 mm Hg and the set tidal volume is set at 500 mL’s, if the pressure limit is reached and the patient has only received 250 mL’s of the set 500 mL’s, the patient will only receive 250mL’s and not 500mL’s. The benefit is that this mode protects against barotrauma (VILI caused by high ventilator pressures).
Disadvantage:
This mode is very popular at many centers so it’s important to understand the drawbacks. This tiny therapist isn’t always the brightest though and can be fooled a lot. For example, if your patient is becoming agitated with increased work of breathing, then it may appear to the tiny therapist that the patient’s compliance is getting better because they are giving more effort. In reality the increased effort may be because the patient compliance is getting worse, they are wanting more pressure, and getting restless and agitated. As they get more agitated they may become more tachypneic working harder to get a breath. The tiny therapist however, thinks they are doing better and gives less pressure – a vicious cycle. You can either sedate, but perhaps giving them more pressure or a set pressure may help but this may mean switching their mode to a pressure mode. Another draw back is if your patient is coughing a lot then this high pressure during coughing may hit high pressures on the ventilator and the ventilator may cycle into expiration early.
Synchronized Intermittent Mandatory Ventilation (SIMV + PS)
This is the most popular mode in almost every pediatric intensive care unit and some adult intensive care units as well. This mode can be combined with volume assist/control, pressure assist/control or pressure regulated volume control. With this mode, the patient can receive all three types of breaths: assisted breaths, controlled breaths and supported breaths(pressure supported). You can’t just choose SIMV + PS alone, but you must select this mode to be used with a volume, pressure, or PRVC mode. We reviewed how this mode works in Part 1 (please review if needed).
There really is no great evidence based reason we choose this in the PICU but it theoretically has some benefits. First, in addition to controlled or assisted breath your patient has the ability to take supported breaths, which may prevent diaphragmatic weakness which may result quickly if your patient’s breaths are all assisted or controlled (3). Second, the assisted or controlled breaths your patient will receive are very helpful especially in pediatric patients who may need to be more aggressively sedated. Children can often require more sedation, which can lead to respiratory depression and apnea. So if my patient is set at low respiratory rate and is taking plenty of supported breaths (pressure support) and now they become apneic due to sedation, then I am at least glad they will receive these controlled breaths being delivered. Third, is that when I wean the rate on the ventilator, I am actually weaning the assisted or controlled breaths only, so that my patient should be getting the majority of their breaths as spontaneous, supported breaths. When my rate is weaned to a minimum, and my patient is taking adequate supported breaths, then they are likely ready to extubate. This seems to make sense and if your wondering why this isn’t used in all our adult patients as well; the available data shows that weaning on SIMV, compared to daily spontaneous breathing trials showed slowed ventilator liberation (4). The fourth reason we use this in the PICU is that we have always done it this way, so there is comfort and familiarity with its use from nurses, respiratory therapists, and physicians.
Disadvantage:
This mode can lead to ventilator-patient dyssynchrony and patient agitation and discomfort. I believe one of the main reasons this happens is that patient can get various types of breaths delivered. If your patient just triggered one of the mandatory breaths and lets say they received a tidal volume of 300 cc (regardless of whether it was pressure or volume delivered) and then they trigger a pressure support breath and only get 100cc, because they may be still weak, then they may feel uncomfortable. They may have enjoyed that larger tidal volume breath but unhappy with the smaller pressure supported breath. To help your patient, don’t just sedate them but increase their pressure support breath to achieve at least ½ to ¾ of their assisted or controlled tidal volumes and re-adjust the pressure support if your patient gets worse or gets better. This is so important and I constantly see this error of too low a pressure support being set by physicians and respiratory therapists which often leads to the patient getting over sedated.
Oxygenation Dials:
Fraction of Inspired Oxygen (fi02)
You need to select an amount of fi02 between 0.21% – 1.00%. As I mentioned in PART 5, I usually give my newly intubated patient a short amount of time receiving 100% then quickly turn the dial down to 40-50% and ultimately trying to keep them < 60% to avoid the harmful effects of hyperoxia. Hyperoxia can be injurious to your patients and therefore should be quickly weaned to less than 60% as soon as possible to keep oxygen saturations 90-94% (5). An unsafe, very common practice is to place a patient on 100% oxygen and wean them slowly. Far too often the oxygen gets weaned too slowly or worse yet, forgotten. Oxygen and the effects of hyperoxia are not benign and linked to worse outcomes (5).
So after I intubate, I will quickly turn the fi02 down to 40% and then give more oxygen (if needed) to keep my oxygen saturation between 90-94% (ARDSnet goal 88-95%). I consider it an emergency if my patients cannot wean to less than 60% within a few hours of intubation and lets me know I may be dealing with a patient with refractory hypoxemia and I may need to be more aggressive earlier in their management. Sometimes the hypoxemia may be from atelectasis and they may need time to recruit their alveoli. In the meantime, I start to consider further interventions such as re-adjustment of my PEEP, paralysis, prone positioning and perhaps if these measures fail, ECMO. So weaning fi02 quickly prevents effects of hyperoxia and also tells you earlier the severity of their hypoxemia in order to consider early aggressive therapy.
PEEP:
There is unfortunately no dial you can turn that says mean airway pressure, but you will be asked to set the PEEP. To optimize our mean airway pressure, and provide effective oxygenation then we need to set an optimal PEEP level. I usually a minimum of 5 mmHg of PEEP, but your PEEP may need to be set much higher based on your patient ideal PEEP as we discussed earlier.
Ventilation Dials:
Respiratory Rate:
This is truly the main way we improve ventilation as we typically set up the tidal volume at 6 mL/kg based on ideal body weight and try not to deviate too far from this. As we discussed, if a patient has a severe metabolic acidosis, then we will want a very high respiratory rate, and if a patient has obstructive physiology, we will want a low rate. For both of these patients, you will want to check a blood gas after 20-30 minutes, and then re-adjust your rate accordingly.
Recall if your rate is too fast then you may develop auto-peep so you may have to either decrease your rate or adjust your inspiratory time or inspiratory flow rate. We discussed that the majority of patients tolerate permissive hypercapnea (or submissive hypercapnea) with the exception of pregnant females, patients with serious head injuries who have elevated ICP, and those with severe pulmonary hypertension. These patients may need more sedation, as the effects of hyperacapnia can be uncomfortable.
When you intubate a pediatric patient they will require a higher respiratory rate, which for them may be a normal respiratory rate (see the chart below).
Combined Oxygenation & Ventilation Dials:
Inspiratory Time/Expiratory Time/Flow Rate:
We have discussed this in other sections modifying I:E ratio for different reasons. If you want to increase a patients mean airway pressure and give higher inspiratory pressures then allow a longer inspiratory time. If you’re dealing with obstructive physiology, then you may have to shorten the inspiratory time allowing a breath to go in quicker and therefore give a patient more time to expire. Often patients may be uncomfortable so adjusting the speed in which you deliver the inspiratory breath may also improve a patients comfort.
Take Home Points:
- We discussed many modes of ventilation throughout these 6 parts, but to start, become comfortable with one or two modes and learn them well.
- When setting up your ventilator, remember to think about your patient’s physiology.
- Severe metabolic acidosis (Part 3)- High minute ventilation, and recheck pH
- Obstructive physiology (Part 4): Low rate, consider a volume mode, increased inspiratory flow rate (if needed) and monitor for air trapping
- Refractory hypoxemia (Part 5): Set adequate PEEP, low tidal volume ventilation of 6mL/Kg based on ideal body weight
- All other patients set up as if they have refractory hypoxemia as they are risk for development of lung injury during mechanical ventilation
Early in my career, I would get great joy out of successfully and skillfully intubating a patient. These days however, my greatest joy is successfully extubating my patients, because I realize that so much can go wrong from the time a patient is intubated until they are ready to be extubated. Intubation carries it’s own important risks, but of equal importance are the risks from mechanical ventilation. This 6 part series was simply meant to give you the basics of mechanical ventilation. There is still so much to be learned in the area of mechanical ventilation, but my hope is that this series helps you continue to provide optimal care for your patients!
References:
- Futier E et al. A Trial of Intraoperative Low-Tidal-Volume Ventilation in Abdominal Surgery”. N Engl J Med 2013. PMID: 23902482
- Serpa Neto A. et al. Association Between Use of Lung-Protective Ventilation With Lower Tidal Volumes and Clinical Outcomes Among Patients Without Acute Respiratory Distress Syndrome: A Meta-Analysis. JAMA 2012. PMID: 23093163
- Levine S et al. Rapid Disuse Atrophy of Diaphragm Fibers in Mechanically Ventilated Humans. N Engl J Med 2008. PMID: 18367735
- Esteban A et al. A Comparison of Four Methods of Weaning Patients From Mechanical Ventilation: Spanish Lung Failure Collaborative Group. N Engl J Med 1995. PMID: 7823995
- Pannu SR. et al. Too Much Oxygen: Hyperoxia and Oxygen Management in Mechanically Ventilated Patients. Semin Respir Crit Care Med 2016. PMID: 26820270
For More on this Topic Checkout:
- Frank Lodeserto at REBEL EM: Simplifying Mechanical Ventilation – Part I
- Frank Lodeserto at REBEL EM: Simplifying Mechanical Ventilation Part 2 – Goals of Mechanical Ventilation & Factors Controlling Oxygenation and Ventilation
- Frank Lodeserto at REBEL EM: Simplifying Mechanical Ventilation Part 3 – Severe Metabolic Acidosis
- Frank Lodeserto at REBEL EM: Simplifying Mechanical Ventilation Part 4 – Obstructive Physiology
- Frank Lodeserto at REBEL EM: Simplifying Mechanical Ventilation Part 5 – Refractory Hypoxemia & APRV
Post Peer Reviewed By: Salim R. Rezaie, MD (Twitter: @srrezaie)
The post Simplifying Mechanical Ventilation – Part 6 – Choosing Your Initial Settings appeared first on REBEL EM - Emergency Medicine Blog.
